Author Archives: junaidsable

egg less cheese cake

Recipe of Egg less cheese cake

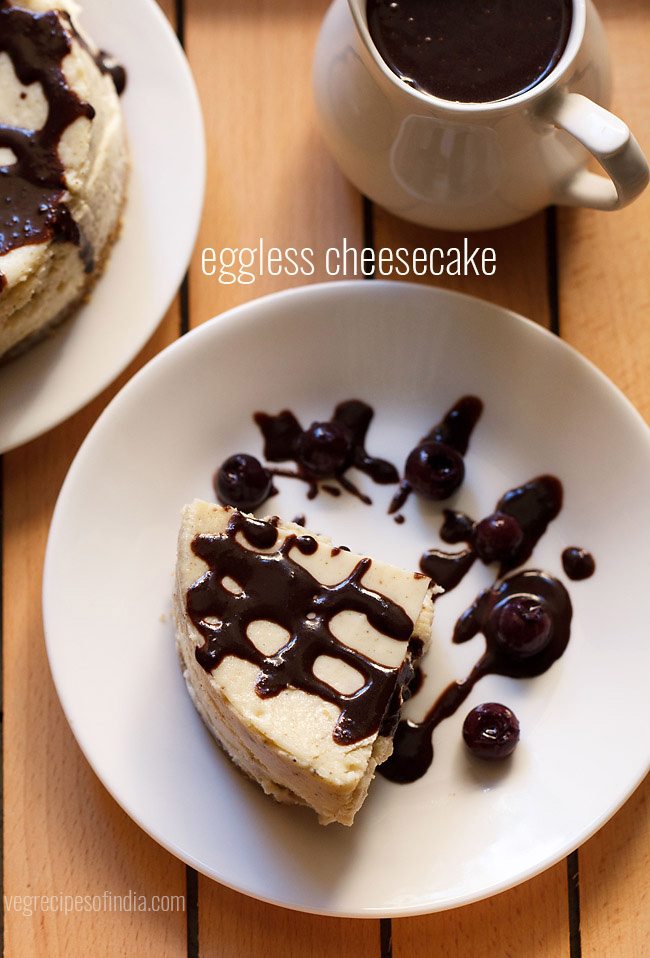
I had got a few recipe requests for sharing an egg less cheesecake. this recipe is a baked version and does need an oven. This cheesecake was loved by the guests we had on this day. I have made a chocolate sauce for the cheesecake.

INGREDIENTS FOR CHEESECAKE RECIPE

  • 10 to 12 digestive biscuits or crackers or marie biscuits
  • 1 tablespoon melted butter, salted or unsalted
  • 3 cups cream cheese OR 600 grams cream cheese
  • ¾ cup sugar OR 150 grams sugar
  • 1 tablespoon corn starch
  • 1 teaspoon vanilla extract or powder
  • ½ cup cream, – 25% to 50% fat
  • 1 tablespoon lemon juice

HOW TO MAKE CHEESECAKE RECIPE

Preparing biscuit crust for cheesecake

  1. take 10 to 12 digestive biscuits or crackers or marie biscuits. break them and add in a blender or grinder jar.
  2. grind to a fine powder. take this powder in a mixing bowl.
  3. add 1 tablespoon melted butter in it. mix very well with a spoon.
  4. now place this mixture in greased spring pan. grease the pan very well with butter. 
  5. with your fingertips or the back of a small glass or bowl, press the biscuit+butter mixture and make a neat and even layer. keep this pan in the fridge for 20 to 30 minutes, so that the biscuit layer sets.

Making cheesecake

  1. in another bowl, take 3 cups cream cheese (600 grams), ¾ cup sugar (150 grams), 1 tablespoon corn starch, 1 tablespoon lemon juice and 1 teaspoon vanilla extract or powder.
  2. now with an electric beater, start to beat this mixture.
  3. use a medium to medium-high speed and whip till smooth. do not over beat. 
  4. now add ½ cup cream.
  5. again beat the mixture till the cream is blended very well and you see a homogenous, creamy, thick smooth mixture. do not over beat. 
  6. now pour the whipped cream cheese layer in the pan. with a spatula even the top.
  7. keep the pans in a preheated oven and bake for 30 to 40 minutes. preheat oven at 180 degrees celsius for 15 minutes and keep both the top and bottom heating elements on. keep the pans in the middle rack.
  8. to check the doneness, the sides will look firm, risen and the center of the cheesecake will be wobbly. the sides will also look separated from the pan. let the cheesecake cool at room temperature.
  9. then cover with a foil or an air tight lid and place the pans in the fridge for 4 hours or more. you can also keep overnight.

For chocolate sauce

  1. take ½ cup hot milk in a bowl. you can heat milk in a pan or a microwave. no need to boil the milk. just let it get hot.
  2. add 1 cup roughly chopped sweet chocolate (75 grams). if using semi sweet or bitter chocolate, then do add sugar as per taste.
  3. mix very well with a spoon or spatula till all the chocolate dissolves.
  4. let the chocolate sauce cool at room temperature.

Removing cheesecake from the pan

  1. dip a butter knife in a bowl or cup containing warm water.
  2. now take the butter knife and gently slid through the sides of the pan, separating the cheesecake from the pan.
  3. push the detachable lid from the bottom and gently remove the cheesecake. then remove the lid from the base.
  4. place the cheesecake on a serving plate or tray.
  5. drizzle the chocolate sauce and serve. or your family or guests can serve the chocolate sauce themselves on the sliced cheesecakes. if you want you can even add some berries like blueberries, blackberries or strawberries while serving. dry fruits can also be sprinkled on the cheesecake.

Tips for making cheese cake recipe

  • keep all the ingredients at room temperature, including cream cheese, vanilla extract or powder and cream. 
  • do not over beat the cream cheese. doing so may result in cracked tops once the cheese cake gets baked.
  • do keep a check while baking as oven temperatures vary. so it can take less or more time than what is mentioned in the recipe. do not over bake. if you see cracks on top, then remove it from the oven. 
  • you can skip making the chocolate sauce but i would suggest to make it.
Baked egg less cheese cake

How to make gluten sugar free cookies

Don’t you love the cookies? Sweet and chocolaty cookies! But can we make it healthy? Yes, you can with my recipe for gluten sugar free cookies!!

Although, I’ll be honest, sometimes making gluten-free cookies is kind of scary.

What scares you off from making gluten-free cookies? Crumbling. That’s what I’m always afraid of. Some cookies  are no-brainers, but sugar cookies are different – I mean, you actually have to roll them out and hope they don’t crumble when you move them to the cookie sheet.

So believe it or not, in the first six years I baked gluten-free, I never sugar cookies.

But eventually I got tired of being taunted by those beautiful soft frosted sugar cookies at the local grocery store bakery, and decided to bite the bullet and make my own.

It’s really easy once you just buckle down and do it. And no, they don’t crumble apart. They’re soft and fluff, just like a good sugar cookie should be.so, aim sharing my recipe for gluten sugar free cookies which you will really enjoy making and having.

INGREDIENTS

For the cookies
2 cups (280 g) all-purpose gluten-free flour (I like (mock) Better Batter with this recipe)

1 teaspoon xanthan gum (omit if your blend already contains it)

3/4 teaspoon baking powder

1/4 teaspoon kosher salt

1/2 cup (100 g) granulated sugar

3 tablespoons (22 g) confectioners’ sugar

8 tablespoons (112 g) unsalted butter, at room temperature

1 egg (50 g, weighed out of shell) at room temperature, beaten

1 teaspoon pure vanilla extract

For the frosting
10 tablespoons (140 g) unsalted butter, at room temperature

1/4 cup (2 fluid ounces) milk, at room temperature

1 tablespoon pure vanilla extract

1/8 teaspoon kosher salt

2 teaspoons Meringue powder (Loran brand is gluten free)

4 cups (460 g) confectioners’ sugar

Sprinkles (optional)

DIRECTIONS

Report this ad

  • Preheat your oven to 350°F. Line rimmed baking sheets with unbleached parchment paper and set them aside.
  • In a large bowl, place the flour, xanthan gum, baking powder, salt, granulated sugar and confectioners’ sugar and whisk to combine well. Add the butter, egg and vanilla, and mix to combine. The dough will be thick and relatively stiff, and you may need to squeeze it together with your hands to bring all of it together.
  • Roll the dough between two sheets of unbleached parchment paper into a round a bit less than 1/3-inch thick. Using a 2 1/2-inch round cookie cutter cut out rounds of dough and places them about 1-inch apart on the prepared baking sheets.
  • Place the baking sheet in the center of the preheated oven and bake until just set, about 6 to 8 minutes, depending upon size. The edges of some of the cookies may brown slightly. Take them out before there is any significant browning. Remove the cookies from the oven and allow them to cool until set. Transfer to a wire rack to cool completely.
  • While the cookies are cooling, make the frosting. In the bowl of your stand mixer fitted with the paddle attachment, place the butter, milk and vanilla, and mix on medium speed until combined. Turn the speed up to high and mix until creamy. Add the salt, meringue powder and about 3 1/2 cups of confectioners’ sugar. Mix slowly until the sugar is incorporated. Turn the mixer up to high and beat until it becomes uniformly thick. Add the rest of the confectioners’ sugar if necessary to thicken the frosting.
  • Once the cookies are completely cool, pipe or spoon a generous amount of frosting onto the top of each, and spread into an even layer with a wide knife or offset spatula. Scatter sprinkles, if desired. Allow to sit at room temperature until the frosting hardens a bit. Store any leftovers in an airtight container at room temperature.

Try this recipe once its worth a shot and share your experience in the comments and also suggests what next recipe you would like to know..

Recipe for home-made chocolate cake

A few weeks ago, I made an ever-so secret birthday cake for one of my housemates. Chocolate, naturally from the recipe of home-made chocolate cake: the cast iron crowd-pleader of cakes. Searching for the perfect recipe,

The birthday girl loved her surprise, and indeed “that cake” hit many of the necessary buttons: moist, dark and crumbly, it was still going strong a couple of days later

Flavor was the real plus point in a dessert-style chocolate cakes of course,  it generally has to be eaten in teeny tiny slivers with a fork. A chocolate cake in the truest sense of the word. Not a torte, not a mousse, not a pudding, but a cake of my. And that, surely, isn’t beyond the bounds of possibility.

Recommendations came flooding in for the cake I prepared home-made chocolate cake for the party. I would love to share my recipe for the homemade chocolate cake with you all so that u can also try it for your loved ones.

INGREDIENTS

  • Shortening, as needed
    • 2 cups all-purpose flour, plus extra for the pans
    • 3/4 cup unsweetened cocoa powder
    • 1 teaspoon baking soda
    • 3/4 teaspoon baking powder
    • 1/2 teaspoon salt
    • 3/4 cup (6 ounces) unsalted butter, at room temperature
    • 2 cups sugar
    • 3 large eggs, at room temperature
    • 2 teaspoons vanilla extract
    • 1 1/2 cups whole milk

Equipment

  • Cake pans, as needed
    • Waxed or parchment paper
    • Paper cupcake liners (if making cupcakes)
    • Medium bowl
    • Whisk
    • Electric mixer
    • Rubber spatula
    • Toothpick
    • Wire cooling racks

PREPARATION

1 Preheat the oven to 350°F.

2. Read the directions for your chosen a decorated cake to see what size pans to use. Lightly grease the bottom of each cake pan, then line it with waxed paper or parchment paper and grease and lightly flour the bottom and sides. If you are making cupcakes, line the cups with paper liners.

3. In a medium bowl, whisk together the 2 cups flour, the cocoa powder, baking soda, baking powder, and salt.

4. Using an electric mixer on medium to high speed beat the butter in a large bowl for 30 seconds. With the mixer on medium speed, gradually add the sugar, about 1/4 cup at a time, beating each addition 3 to 4 minutes or until well combined. Using a rubber spatula, scrape down the sides of the bowl; continue beating on medium speed for 2 minutes more, until the mixture is smooth and creamy. Add the eggs 1 at a time, beating for 30 seconds after each addition. Beat in the vanilla extract.

5. With the mixer on low speed and beating until just combined after each addition, beat the flour mixture into the butter mixture in 3 additions, alternating with 2 additions of the milk. With the mixer on medium to high speed, beat the batter for 20 seconds more.

6. Using a rubber spatula spread the batter in the prepared pans. Unless your project directions indicate otherwise, fill round, square, rectangular, or shaped pans two-thirds full; fill cupcake cups two-thirds full. Bake the cake(s), referring to your for the baking time; each cake is done when a toothpick inserted in the center comes out clean.

  • Transfer the cake in the pan to a wire rack. Cool in the pan for 10 minutes, then invert onto the rack, lift off the pan, and peel off the waxed paper. Let the cake cool completely on the rack. Remove cupcakes from the pans after cooling for 15 minutes.

Devil’s Food Cake Variation:

Follow the chocolate cake recipe, using 1 1/4 teaspoons baking soda and omitting the baking powder.

so, this was my recipe for home made chocolate cake came from my own brain and  It was a shoo.